Contents
Here, authentication refers to an information exchange between a user’s authenticator and an application a user wishes to interact with. Typically, applications need some knowledge about their users. For example, a DeFi protocol needs to know about the assets a user holds in their authenticator, and a writing app needs to connect users with the notes they’ve taken in the past. Let’s take a look at how it works.
On the surface, the authentication flow on Stacks is similar to the typical client-server flow used by centralized sign-in services. The key difference is that authentication occurs entirely client-side; no user information needs to be passed to a server.
Authentication at a High Level
In this authentication flow, you have two parties: an app and an authenticator (aka wallet or agent of the user, like Leather). In order to verify the user’s identity, these two parties pass two tokens back and forth to authenticate the user.
- authRequest: the token sent by the app requesting authentication.
- authResponse: the token sent back by the user’s authenticator.
Those tokens are passed back and forth via a URL query string.
First, an app creates an ephemeral transit key, for the sole purpose of the authentication. The public part of this ephemeral transit key is passed to the authenticator within the authRequest token.
The authenticator then uses the received public key (of the ephemeral transit key) to encrypt an app private key, which is returned in the authResponse token. The app private key is generated from the user’s private key and from the app’s domain. This key is deterministic, meaning the key will always be the same for a given Stacks address and app domain.
Once the authResponse token is sent back, the app should have all necessary information to perform its services. This whole communication using tokens might sound complicated but is completely handled by the functions provided in the Stacks.js libraries.
Keeping Track of User State and Setting Permissions
Apps can obtain this information, as well as the current authentication state of a user, through the userSession object.
Before we start to authenticate, it’s important to determine the correct permissions your app needs from a user and configure them using the appConfig object. You can request any of the following permission scopes:
- store_write: this allows the app to read and write data to the user’s Gaia hub in a storage bucket specific to the app. This is a good fit for applications that need to store user data, but have no need to make that information publicly accessible, like a note taking application.
- publish_data: this allows the app to publish data, so other users of the app can discover and interact with that user and that published data. This permission is important for applications that have a network component, such as social media applications.
Creating a new AppConfig() without providing permission scopes will default to only the store_write scope.
Initiating the Authentication Flow
To prompt new and existing users to authenticate, you can use the showConnect function:
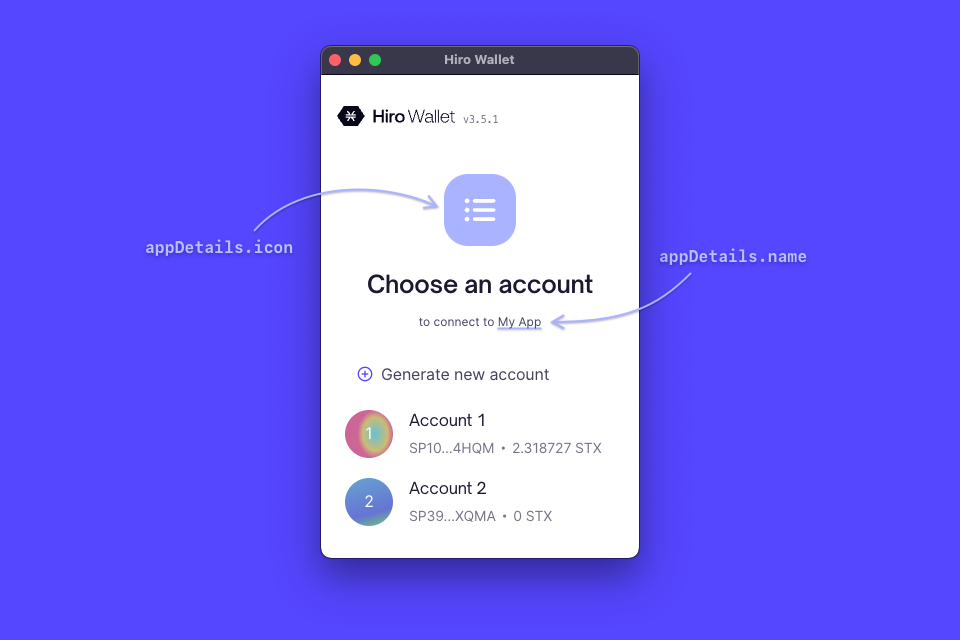
Calling this function (e.g. via a button’s onclick) from the app triggers the Hiro Wallet (or another authenticator), prompting them to go through the authentication flow. From there, the user can generate a new address if needed or select an existing one before returning to the app. As you can see in the code above, the function also allows you to pass through a few properties to customize the appearance of the modal, including:
- The name and icon of the app
- A redirectTo string that provides a URL that users will be redirected to after they successfully authenticate
The authentication modal ultimately looks something like:
Conclusion
We created the connect package in Stacks.js, to make implementing authentication a straightforward and easy process for app developers. I hope this overview was helpful for those looking to gain an understanding of how it works. To learn more about user authentication, read our documentation for additional details. Happy coding!