Contents
Signing transactions ties its ownership attestation to its original sender. It proves that the sender of the transaction says who they say they are. Signing transactions on Stacks works a bit differently than arbitrary message signing. A few prepared components are necessary before putting pen to paper (a metaphor for the act of signing).
The initial construction of a Stacks transaction is made conveniently through a primitive @stacks/transaction method called <code-rich-text>makeUnsignedContractCall<code-rich-text>, which is used by wallets and when developing locally. What this method does is construct a StacksTransactionWire type based on the options passed in.
For simplicity, we’ll focus on a single signature authorization on a contract call transaction type.
The below is an example of how developers would call this function:
Not all of the options shown in the example above are required to be passed in upon construction but you can see how many of the options are necessary to give context to the transaction.
This would output the below <code-rich-text>StacksTransactionWire<code-rich-text> with the signature field populated with zeroes:
You’ll notice the entire transaction is almost complete except for the <code-rich-text>signature.data<code-rich-text> field which contains all zeros at the moment because we haven’t formally signed the transaction yet with the corresponding private key to the public key. The zeros are acting as a temporary placeholder.
From here, it’s common practice to then pass <code-rich-text>transaction<code-rich-text> into a TransactionSigner class to then call the available <code-rich-text>signOrigin<code-rich-text> method with a private key as the argument. But what actually takes place in <code-rich-text>signOrigin<code-rich-text>? And what if you want to use external signing tools in tandem with Stacks transactions?
The remainder of this post will walk you through the steps to properly sign a single signature transaction based on the standard outlined in SIP005.
Steps to single signature transactions on Stacks:
- Generate <code-rich-text>sigHash<code-rich-text> from unsigned transaction
- Generate <code-rich-text>presign-sigHash<code-rich-text>
- Sign <code-rich-text>preSignSigHash<code-rich-text> using ECDSA
- Concatenate signature components in VRS order
- Reassign <code-rich-text>spendingCondition.signature<code-rich-text> with <code-rich-text>nextSig<code-rich-text>
Generate sigHash from unsigned transaction
The <code-rich-text>sigHash<code-rich-text> represents a hash of an unsigned transaction, which can be constructed using the return value of the <code-rich-text>makeUnsignedContractCall<code-rich-text> method, which is the transaction variable initialized in our let variable above.
This <code-rich-text>StacksTransactionWire<code-rich-text> (<code-rich-text>transaction<code-rich-text> variable) contains a <code-rich-text>signBegin<code-rich-text> method to output the <code-rich-text>sigHash<code-rich-text> property of the transaction.
As an alternative, calculating the <code-rich-text>sigHash<code-rich-text> manually can also be done by setting the fee and nonce fields of the <code-rich-text>transaction.auth<code-rich-text> property to 0. Be sure that the <code-rich-text>signature.data<code-rich-text> field bytes are also set to 0. The new <code-rich-text>transaction.txid<code-rich-text> property will now be considered the <code-rich-text>sigHash<code-rich-text>.
Generate preSignSigHash
A <code-rich-text>preSignSigHash<code-rich-text> then needs to be generated from the <code-rich-text>sigHash<code-rich-text> and a few of the transaction’s spending condition properties such as the authorization type, fee, and nonce.
The resulting <code-rich-text>preSignSigHash<code-rich-text> is what ultimately gets signed by the private key using ECDSA over the secp256k1 curve.
Sign preSignSigHash using ECDSA
Signing should return a recoverable signature (in VRS order). This signing process can be abstracted using the <code-rich-text>signWithKey<code-rich-text> method from <code-rich-text>@stacks/transactions<code-rich-text>. You could also use any compatible libsecp256k1 implementation. The below snippet uses @noble/secp256k1, which is what <code-rich-text>signWithKey<code-rich-text> uses under the hood.
You might have noticed that we are slicing out the first 32 bytes of our Stacks private key. Reason being is that if you generate private keys using stacks.js primitives, a <code-rich-text>01<code-rich-text> hex byte is suffixed at the end of the private key for identification.
The raw signature payload will consist of 3 components: r, s, and v.
3 components of a ECDSA signature:
- r (32 bytes): The x-coordinate of a point on the elliptic curve, derived during the signing process.
- s (32 bytes): A scalar derived from the message hash, private key, and the nonce <code-rich-text>k<code-rich-text>.
- v (1 byte): Indicates which of the two possible public keys was used to generate the signature.
Concatenate signature components in VRS order
Depending how the <code-rich-text>r<code-rich-text> and <code-rich-text>s<code-rich-text> values are returned, you’ll want to convert them to their hexadecimal format and concatenate all 3 values in VRS sequence.
The resulting concatenated signature is referred to as the <code-rich-text>nextSig<code-rich-text>, which is the final signature used to reassign the placeholder 0’s in the current <code-rich-text>signature<code-rich-text> property of <code-rich-text>transaction<code-rich-text>.
The final signed <code-rich-text>StacksTransactionWire<code-rich-text> of the same transaction variable would like the below:
Instead of the <code-rich-text>signature.data<code-rich-text> field being zeroed out, it’s now populated with the <code-rich-text>nextSig<code-rich-text> variable we generated.
The final serialized transaction is outputted in big-endian hexadecimal format. If you look closely, you could see where the signer’s public key and signature are placed.
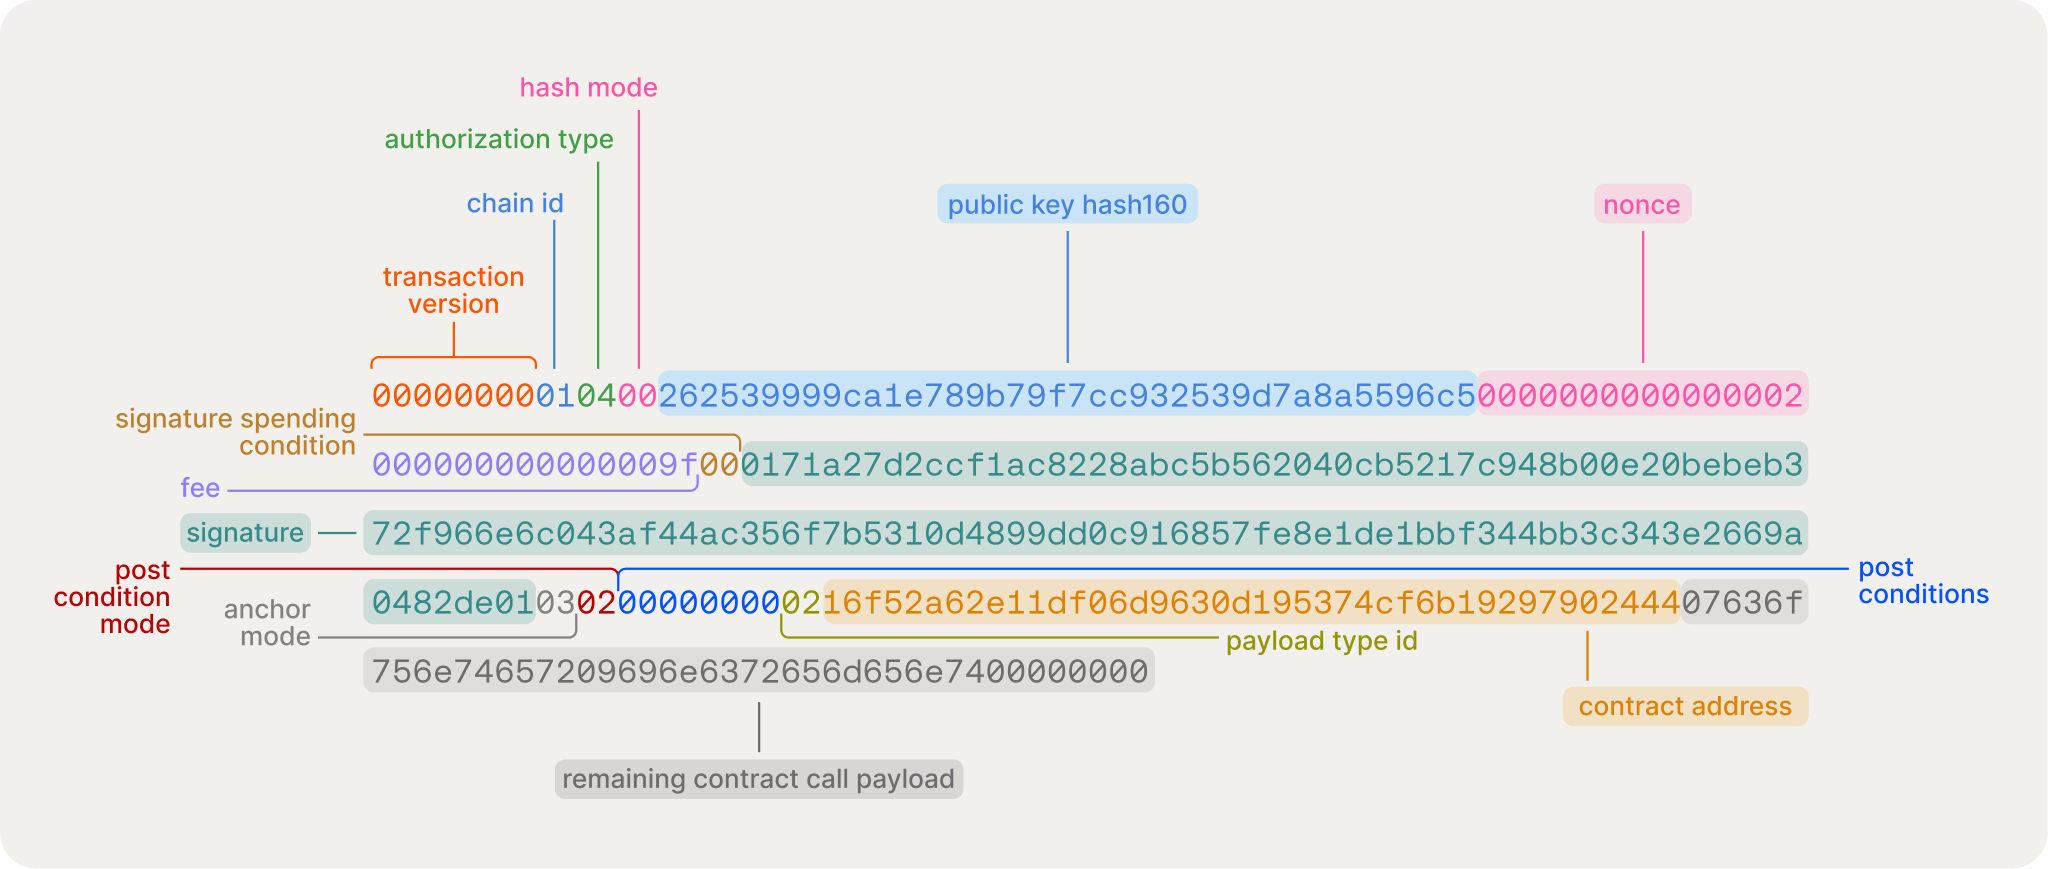
This transaction payload acts as the actual message that is broadcasted amongst nodes in the Stacks network.
What's Next
You now have the knowledge of what it takes to properly sign a Stacks transaction. Any external signing tool that uses ECDSA with the secp256k1 curve can properly sign Stacks transactions. Take advantage of using external signing tools, such as TurnKey’s embedded wallet solutions, with signing Stacks transactions.